I had a request for an explanation on how I made this 3d gif:
Its pretty easy to do a simple gif similar to the one above. I used Photoshop but really all you need is something that can combine images into gifs.
Step 1 Create Your Layers
The basic idea is that you are animating layers in Photoshop to create the illusion of depth by simulating what each eye might see in stereovision. The layers should represent things that are in front and behind other things in space. In my example I had 3 layers, the skull is in the foreground, the swirls are in the mid ground, and the circle is in the background. I drew these 3 images on separate pieces of paper, photographed them, and then erased everything around them in Photoshop so that each image had transparency around it.
Step 2 Combine Your Layers
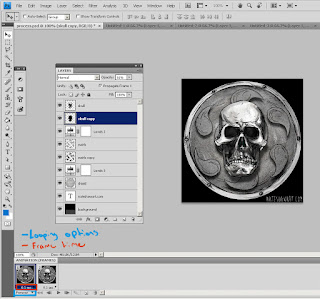
Copy each of the images into one Photoshop doc, ordering them on different layers. The top layer should be what is closest and the next layer should be what is directly behind that and so on.
Step 3 Make Shadows
Duplicate each layer except the bottom one, use the contrast tool to make it black, blur it by about 3 pixels or whatever is appropriate to your image and then adjust the opacity to get a look you like. These shadow layers should be grouped with the layer that they are being cast on and they should always be sitting on top of a lower layer. No floating shadows! After this is done I like to group my layers for animation.
Right click on the layer and choose "Duplicate Layer..."
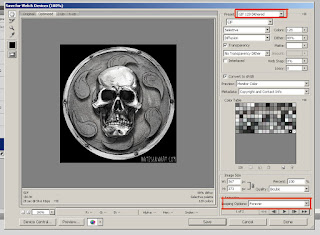
"Image->Adjustments->Brightness/Contrast"
"Filter->Blur->Gaussian Blur..."
Step 4 Animate It!
Turn on the animation timeline. Go to "Window->Animate", this will open up the animation timeline. The little thumbnail of your artwork represents one frame in your animation. The rate at which your animation will play is under that thumbnail and how your animation loops can be changed by the drop down below that. Now that your layers all are set up, duplicate the first frame. I like to keep the first frame clean of any changes, Photoshop's animation functionality isn't the most refined and you can quickly confuse yourself. Since this animation is really simulating the view from a pair of eyes, you only need two frames that swap off, looping forever.
In the second frame, move the top layer to the right 1 pixel and the bottom layer left 1 pixel, keeping the middle layer in the same spot. This could be different for your individual image and the look you are going for but its a good place to start. Now make sure that the time is set to 0.1 sec, and it is looping forever. You can test your gif out by hitting the play button. If it looks good go to File>Save for Web and devices, set it the preset to "GIF 128 Dithered" and double check your animation settings in the bottom right of the popup.
This should give you a simple wiggle gif. The nature of this technique gives you a very "card-y" 3d gif. If something was truly in stereo, each eye would see something a little different, more of one side of the skull for example. That is a bit more tricky and would require careful drawing of two images for one object, renders from a 3d application, or photos taken from two cameras or a stereo camera. If anyone has questions or comments I'd be happy to answer anything in the comments. Thanks!