NATE SHAW LIGHTING & LOOKDEV VFX REEL 2014 from NATE on Vimeo.

Showing posts with label animation. Show all posts
Showing posts with label animation. Show all posts
Wednesday, October 22, 2014
Monday, October 20, 2014
Divergent: CG Dog & Houdini Feather System
While I was organizing my latest reel I thought it would be fun to make some gifs of my work in the past few years. The first one and my favorite project so far at Method is Divergent. For the film I lookdev'd a cg dog and some cg ravens. Conveniently someone already made a gif of the dog that I did for the mirror room sequence.

The Dog
The dog was a pretty straight forward fur groom. Of course I used Houdini's fur grooming tools, not quite out of the box but customized for better control. The challenging part of this groom was the length of the fur and the fact that I had to match a live dog exactly. Long fur tends to have S shaped bends where the fur bends back on itself a couple times. To get this effect I combo'd direction, curl, and frizz attributes. It wasn't always a perfect S curve but it got close enough. The on set crew filmed a live dog but due to the complexity of the sequence and the infinite mirror reflection the environment, we had to supplement the further back reflections with a cg dog. This combined with the fact that I also had to do a jaw replacement for the dog in a few shots, half his face real half cg, and a few full cg hero dogs, the dog had to match perfectly. This just meant a lot of time with a line up camera going back and forth between the live dog and the cg one. I learned a couple of things on this groom. First was that its sometimes easier to to get precise coloring with painting color attributes in Houdini rather than relying on a texture artist. Since most texture artists don't have much experience with fur, they tend to just paint color patches where they see them. This is problematic with long fur though. Since the fur gets it's color from the root point attribute in Houdini, you have to paint the patches a little offset from where it's supposed to go. I found the feedback loop was much faster to handle this in Houdini rather than back and forth with a texture painter. When I say that I painted color attributes, I mean I painted masks on the geo and drove all of the color in the shader. I believe I had about 15 different mask attributes to drive patterning in this groom, from root and tip color to fades and solids. In addition to handling the shot lighting, the lighters also had to run the fur sims for the dog. Once I dialed in the sim settings, I created a system for the lighters to paint in areas of fur floppiness and a dial to easily control how much floppiness the fur needed in what area. In the end, I'm proud of how the dog turned out, I even got a full cg dog shot, the one in the gif above.

The Ravens
The ravens were a bit more technically challenging than the dog. I ended up using two fur systems and a feather instancing system for various areas of the bird. The easiest feathers were the ones on the head. Those are the finer feathers that look almost like fur. For that I used a straight ahead Houdini fur procedural. The body feathers were slightly trickier. They needed to look like actual feathers and the VFX Supe wanted them to be ruffled up as well. This meant that a displacement map wouldn't work as well as actual geometry. I ended up modeling about six feathers of varying sizes from curves in Houdini. I then made my own grooming system for instancing these feathers. I could paint direction and size and even had the control to animate the feathers raising and lowering on the back of the bird. From these attributes I used Houdini's fast point instancing to put these feathers on the birds at render time. It was a pretty efficient way of getting a really nice textural feel for the body of the ravens. For the wing feathers I modified the fur system to generate fur to look like flat wing feathers. This was a little tricky to do and I built off the work of some of my coworkers earlier feather jobs. In the past at Method, our earlier birds were modeled with curves and I was the first to use the fur procedural for them. Part of the system required grooming every feather to the right shape. Since then, I've modified my feather system on later jobs to use modeled outlines of feathers to derive the shape. The system worked pretty well and the render times were fairly reasonable, though when we got up to 15-40 birds in the frame at a time, some of them full frame, renders started taking a little longer.
The Dog
The dog was a pretty straight forward fur groom. Of course I used Houdini's fur grooming tools, not quite out of the box but customized for better control. The challenging part of this groom was the length of the fur and the fact that I had to match a live dog exactly. Long fur tends to have S shaped bends where the fur bends back on itself a couple times. To get this effect I combo'd direction, curl, and frizz attributes. It wasn't always a perfect S curve but it got close enough. The on set crew filmed a live dog but due to the complexity of the sequence and the infinite mirror reflection the environment, we had to supplement the further back reflections with a cg dog. This combined with the fact that I also had to do a jaw replacement for the dog in a few shots, half his face real half cg, and a few full cg hero dogs, the dog had to match perfectly. This just meant a lot of time with a line up camera going back and forth between the live dog and the cg one. I learned a couple of things on this groom. First was that its sometimes easier to to get precise coloring with painting color attributes in Houdini rather than relying on a texture artist. Since most texture artists don't have much experience with fur, they tend to just paint color patches where they see them. This is problematic with long fur though. Since the fur gets it's color from the root point attribute in Houdini, you have to paint the patches a little offset from where it's supposed to go. I found the feedback loop was much faster to handle this in Houdini rather than back and forth with a texture painter. When I say that I painted color attributes, I mean I painted masks on the geo and drove all of the color in the shader. I believe I had about 15 different mask attributes to drive patterning in this groom, from root and tip color to fades and solids. In addition to handling the shot lighting, the lighters also had to run the fur sims for the dog. Once I dialed in the sim settings, I created a system for the lighters to paint in areas of fur floppiness and a dial to easily control how much floppiness the fur needed in what area. In the end, I'm proud of how the dog turned out, I even got a full cg dog shot, the one in the gif above.
The Ravens
The ravens were a bit more technically challenging than the dog. I ended up using two fur systems and a feather instancing system for various areas of the bird. The easiest feathers were the ones on the head. Those are the finer feathers that look almost like fur. For that I used a straight ahead Houdini fur procedural. The body feathers were slightly trickier. They needed to look like actual feathers and the VFX Supe wanted them to be ruffled up as well. This meant that a displacement map wouldn't work as well as actual geometry. I ended up modeling about six feathers of varying sizes from curves in Houdini. I then made my own grooming system for instancing these feathers. I could paint direction and size and even had the control to animate the feathers raising and lowering on the back of the bird. From these attributes I used Houdini's fast point instancing to put these feathers on the birds at render time. It was a pretty efficient way of getting a really nice textural feel for the body of the ravens. For the wing feathers I modified the fur system to generate fur to look like flat wing feathers. This was a little tricky to do and I built off the work of some of my coworkers earlier feather jobs. In the past at Method, our earlier birds were modeled with curves and I was the first to use the fur procedural for them. Part of the system required grooming every feather to the right shape. Since then, I've modified my feather system on later jobs to use modeled outlines of feathers to derive the shape. The system worked pretty well and the render times were fairly reasonable, though when we got up to 15-40 birds in the frame at a time, some of them full frame, renders started taking a little longer.
Monday, September 8, 2014
Windmill test
I made this animation a while ago at Drexel as I was experimenting with different looks for cg animation. I found this when i was backing up some old data and thought it might make a cool gif.

Thursday, January 2, 2014

Tuesday, December 31, 2013

Sunday, February 3, 2013
How to Make a 3D Wiggle Gif
I had a request for an explanation on how I made this 3d gif:

Its pretty easy to do a simple gif similar to the one above. I used Photoshop but really all you need is something that can combine images into gifs.
Step 1 Create Your Layers
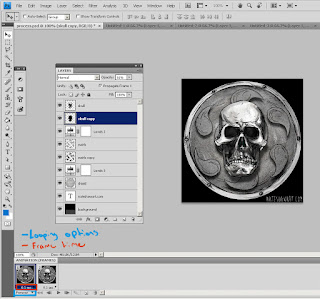
The basic idea is that you are animating layers in Photoshop to create the illusion of depth by simulating what each eye might see in stereovision. The layers should represent things that are in front and behind other things in space. In my example I had 3 layers, the skull is in the foreground, the swirls are in the mid ground, and the circle is in the background. I drew these 3 images on separate pieces of paper, photographed them, and then erased everything around them in Photoshop so that each image had transparency around it.


Step 2 Combine Your Layers
Copy each of the images into one Photoshop doc, ordering them on different layers. The top layer should be what is closest and the next layer should be what is directly behind that and so on.

Step 3 Make Shadows
Duplicate each layer except the bottom one, use the contrast tool to make it black, blur it by about 3 pixels or whatever is appropriate to your image and then adjust the opacity to get a look you like. These shadow layers should be grouped with the layer that they are being cast on and they should always be sitting on top of a lower layer. No floating shadows! After this is done I like to group my layers for animation.
Right click on the layer and choose "Duplicate Layer..."

"Image->Adjustments->Brightness/Contrast"

"Filter->Blur->Gaussian Blur..."


Step 4 Animate It!
Turn on the animation timeline. Go to "Window->Animate", this will open up the animation timeline. The little thumbnail of your artwork represents one frame in your animation. The rate at which your animation will play is under that thumbnail and how your animation loops can be changed by the drop down below that. Now that your layers all are set up, duplicate the first frame. I like to keep the first frame clean of any changes, Photoshop's animation functionality isn't the most refined and you can quickly confuse yourself. Since this animation is really simulating the view from a pair of eyes, you only need two frames that swap off, looping forever.
In the second frame, move the top layer to the right 1 pixel and the bottom layer left 1 pixel, keeping the middle layer in the same spot. This could be different for your individual image and the look you are going for but its a good place to start. Now make sure that the time is set to 0.1 sec, and it is looping forever. You can test your gif out by hitting the play button. If it looks good go to File>Save for Web and devices, set it the preset to "GIF 128 Dithered" and double check your animation settings in the bottom right of the popup.
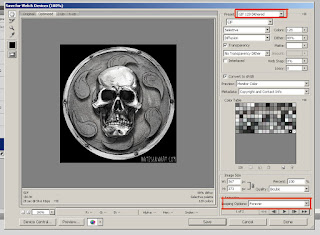
This should give you a simple wiggle gif. The nature of this technique gives you a very "card-y" 3d gif. If something was truly in stereo, each eye would see something a little different, more of one side of the skull for example. That is a bit more tricky and would require careful drawing of two images for one object, renders from a 3d application, or photos taken from two cameras or a stereo camera. If anyone has questions or comments I'd be happy to answer anything in the comments. Thanks!
Its pretty easy to do a simple gif similar to the one above. I used Photoshop but really all you need is something that can combine images into gifs.
Step 1 Create Your Layers
The basic idea is that you are animating layers in Photoshop to create the illusion of depth by simulating what each eye might see in stereovision. The layers should represent things that are in front and behind other things in space. In my example I had 3 layers, the skull is in the foreground, the swirls are in the mid ground, and the circle is in the background. I drew these 3 images on separate pieces of paper, photographed them, and then erased everything around them in Photoshop so that each image had transparency around it.

Step 2 Combine Your Layers
Copy each of the images into one Photoshop doc, ordering them on different layers. The top layer should be what is closest and the next layer should be what is directly behind that and so on.

Step 3 Make Shadows
Duplicate each layer except the bottom one, use the contrast tool to make it black, blur it by about 3 pixels or whatever is appropriate to your image and then adjust the opacity to get a look you like. These shadow layers should be grouped with the layer that they are being cast on and they should always be sitting on top of a lower layer. No floating shadows! After this is done I like to group my layers for animation.
Right click on the layer and choose "Duplicate Layer..."

"Image->Adjustments->Brightness/Contrast"

"Filter->Blur->Gaussian Blur..."


Step 4 Animate It!
Turn on the animation timeline. Go to "Window->Animate", this will open up the animation timeline. The little thumbnail of your artwork represents one frame in your animation. The rate at which your animation will play is under that thumbnail and how your animation loops can be changed by the drop down below that. Now that your layers all are set up, duplicate the first frame. I like to keep the first frame clean of any changes, Photoshop's animation functionality isn't the most refined and you can quickly confuse yourself. Since this animation is really simulating the view from a pair of eyes, you only need two frames that swap off, looping forever.

In the second frame, move the top layer to the right 1 pixel and the bottom layer left 1 pixel, keeping the middle layer in the same spot. This could be different for your individual image and the look you are going for but its a good place to start. Now make sure that the time is set to 0.1 sec, and it is looping forever. You can test your gif out by hitting the play button. If it looks good go to File>Save for Web and devices, set it the preset to "GIF 128 Dithered" and double check your animation settings in the bottom right of the popup.

This should give you a simple wiggle gif. The nature of this technique gives you a very "card-y" 3d gif. If something was truly in stereo, each eye would see something a little different, more of one side of the skull for example. That is a bit more tricky and would require careful drawing of two images for one object, renders from a 3d application, or photos taken from two cameras or a stereo camera. If anyone has questions or comments I'd be happy to answer anything in the comments. Thanks!
Tuesday, October 16, 2012

Wednesday, September 12, 2012
Snow Blind
About a year ago I started this project as a way to improve my reel, specifically in cloth simulation. Along the way I realized that cloth sim is very difficult and, at times, very tedious. However, I also found that I loved painting backgrounds for animations. Its so fun! My bro, Nick Avallone, did the character animation for the first two shots (its so good, thanks Nick!) and I did all the rest. I probably won't be starting on any more 3D animations anytime soon, I don't really have the hardware to handle it. I imagined this piece as the first 30 seconds of a longer piece. (though I haven't written anything longer... yet!)
Saturday, February 11, 2012
Sunday, December 4, 2011
Pond Dude Animatic
woooo-eee I'm all full of updates today! I have started my SESI mentor shot with David Davies from Sony last week. I pitched my story boards and have the ok to move forward with it so I did a quick animatic:
Some concept art for the dude's face:

Some concept art for the dude's face:

Friday, July 8, 2011
Dome Master Renders
I uploaded the dome master renders from the Dragon Dome project. Visually it doesn't make a lot of sense, you have to imagine that this is being projected onto a dome. The edges are between 6 and seven feet all around and the middle is straight up.
For more info on this project, check out my earlier post.
For more info on this project, check out my earlier post.
Sunday, June 19, 2011
Dragon Dome
Judging by my post frequency lately, it looks like I haven't been doing anything lately. Its not true, I swear!

One of the projects I just finished up on was "Dragon Dome." DD was a project for my "Imersive World Building" class at Drexel, one of my very last classes there. The class needs a bit of an introduction to fully understand the project. The idea behind the class is to make an animation for a planetarium. If you've ever been to a science museum, they usually have some sort of astronomy show where they project some stars on a dome. The bulk of these types of shows and others like them show the main action as happening in front of the audience who is probably seated. Things come from behind to appear in front. The problem with the majority of the work is that it does not fully utilize the full screen area, an entire hemisphere.
My goal going into the class was to create something visually stunning that the audience would have to stand in the center of the auditorium to fully appreciate. Things would happen all around the audience who might, at times, have to turn their entire body to catch something happening.
I decided I wanted to feature dragons flying around, making the audience feel like they are dwarfed by giant flying reptiles.

There are some concerns and challenges that are different from the usual flat screen challenges. First of all, the only off screen is below the horizon. Really, the camera needed to be treated not as a camera or picture frame (like most productions) it needed to be thought of a space that the audience inhabits. This means that there couldn't be a floor in our environment, the camera couldn't move, depth of field doesn't make sense, and sizing things was a challenge.
Another interesting challenge was lighting. I am used to lighting things for a single camera. The lights needed to make sense but also illuminate everything, quite challenging in a 360 degree field of view. We found if it was lit too brightly, the light would bounce around the dome and wash everything out.
For the final animation, I teamed up with two of my classmates, Greg Ruane and Dan Bodenstein. The animation started with the two dragons flying right above the audience from the front to the back of the planetarium with two more dragons circling high above. For about 40 seconds dragons weave through tall mountain peaks that dwarf the audience. The animation ends with on hero dragon landing on a rock directly in front of the audience and letting out a huge roar. Audio was completed in an extremely short amount of time by John Avarese, (who, you will remember, completed audio for Big Catch). Unfortunately there is no possible way for me to upload the animation for others to see as, I am assuming, no one that reads this blog has access to a planetarium. Hopefully, it won't be lost to time, at least one more class of Drexel grad students will get to see it, even if I never do again.
For the project, I modeled, sculpted, and textured the dragon. (see previous posts) I textured the mountains and modeled the hero mountain. For the sky, I used nuke to create a star field. I created a noise and tweaked it into tiny, different sized specs and glowed the heck out of them and then overlayed a colorful milky way-esque texture. It turned out looking pretty good even if the planetarium guy caught my fake star field the moment he saw it. For the hero dragon, I did a cloth sim for the wings using Maya's nCloth.
Dan was the smoke and render TD for the project, in addition to making procedural mountaintops. Rendering this thing was a whole job in itself. We had to take 5 camera's (top, front, back, left, and right) and stitch them together into something that looks like a squished dome. From there they needed to be cut up to the 8 projectors to be projected onto the dome. Dan also figured out a way of getting depth information for the camera that would allow for distance falloff effects, something that was apparently a struggle for the entire dome industry (according to our professor). Dan was hilariously pissed when he found out it was a thesis worthy project, months too late for him to do anything about it.
Greg rigged the dragon and animated him. mmmmm motion paths.
This is a "glommed" image that would get projected onto the dome. It doesn't make a whole lot of sense in its current state (on a 2d plane, your monitor).
What you see in the middle of the image would be directly above the audience and what is on the edges would be just above eye level (what you would see if you looked straight ahead.

Some technical specs:
Software Used:
Maya
ZBrush
Renderman for Maya
Photoshop
Houdini
Nuke
Sky Skan
Monday, March 28, 2011
Big Catch
So nearly six months from the start of production, my Advanced CG/Crowd Simulation animation for Drexel is done. Actual production only happened between late September through very early January. The past couple of months have just been waiting on the audio. If you have seen my reel you've already seen like a third of the animation. So in this case done means I am not going to work on it any more. Its actually really hard for me to watch. Very nearly every scene has issues I wish I could have addressed. Ultimately though, its time to move on. I learned quite a bit throughout the production of this piece.
I have been making animations in Maya for about a year now and I've pretty much stuck to that software (with help from Nuke for some basic compositing). This animation I decided to take on two new major software packages. I had to use Massive (for crowd simulation) to fulfill the requirements of my Crowds class. I also jumped into Houdini for the smoke simulations. I owe a lot to Dan Bodenstein for getting me started with that. I wouldn't have finished the smoke without his help. To get started in learning Houdini, I used a lot of Peter Quint's videos on Vimeo.
The audio and score was made by John Avarese. John teaches a lot of audio classes in the Film Department here at Drexel. He does really good work, including feature work. I was really excited to have him on the project. Definitely check him out: John Avarese.
Anywho, give my animation a look and let me know what you think!

(Click on the picture and watch it in HD)
I have been making animations in Maya for about a year now and I've pretty much stuck to that software (with help from Nuke for some basic compositing). This animation I decided to take on two new major software packages. I had to use Massive (for crowd simulation) to fulfill the requirements of my Crowds class. I also jumped into Houdini for the smoke simulations. I owe a lot to Dan Bodenstein for getting me started with that. I wouldn't have finished the smoke without his help. To get started in learning Houdini, I used a lot of Peter Quint's videos on Vimeo.
The audio and score was made by John Avarese. John teaches a lot of audio classes in the Film Department here at Drexel. He does really good work, including feature work. I was really excited to have him on the project. Definitely check him out: John Avarese.
Anywho, give my animation a look and let me know what you think!
(Click on the picture and watch it in HD)
Thursday, February 10, 2011
Animations!
I uploaded two more animations to my vimeo site this week. The first is "Arrival." This was my animaiton 2 midterm project at Drexel. I worked with Jake Nichols and Kev Gross on it. The responsibility breakdown is on the vimeo site. It was nice to work with a group. We each could really focus on our individual tasks and do the things we liked to do. I had experimented a little with compositing for Moth but for this project I got to really have fun with it. Also thanks to my sister, Nyssa for some ideas when I was designing the texturing of the dragon.
Arrival on Vimeo
The second animation is the throat project I worked on with Jake and my animation 1 prof Dave Mauriello. It was a segment for a longer documentary about a throat doctor.
Throat on Vimeo
Arrival on Vimeo
The second animation is the throat project I worked on with Jake and my animation 1 prof Dave Mauriello. It was a segment for a longer documentary about a throat doctor.
Throat on Vimeo
Saturday, January 29, 2011
My Reel
I finished up putting together my reel: Here on Vimeo!
It is a collection of shots from a handful of animations that I've worked on over the past year at Drexel. Right now its more of a generalist reel, when I get to actually applying for jobs I'll probably edit it to slant it to a more focused skill set. For now, though, its everything. Also, I decided not to include music. In general, when employers are looking at reels they turn it off. When I watch reels I always turn off the music. I know that it would add interest to the piece (as a separate piece unto itself) but there are all sorts of problems with adding music that I didn't want to get into. I figure here is a good spot to recognize the other people that contributed to some of the work shown. Evan Boucher did the character animation for the first two Carver clips and Jake Nichols and Kev Gross worked on "Arrival" with me.
It is a collection of shots from a handful of animations that I've worked on over the past year at Drexel. Right now its more of a generalist reel, when I get to actually applying for jobs I'll probably edit it to slant it to a more focused skill set. For now, though, its everything. Also, I decided not to include music. In general, when employers are looking at reels they turn it off. When I watch reels I always turn off the music. I know that it would add interest to the piece (as a separate piece unto itself) but there are all sorts of problems with adding music that I didn't want to get into. I figure here is a good spot to recognize the other people that contributed to some of the work shown. Evan Boucher did the character animation for the first two Carver clips and Jake Nichols and Kev Gross worked on "Arrival" with me.
Thursday, January 13, 2011
Sunday, November 21, 2010
Updated Pandora Rough Cut
All shots have been finished to a degree. I didn't get a chance to make too many changes to the rendered shots I had last week. Instead, I went ahead and finished most of the animation. All that is left, aside from rerendering the entire animation fixing all of the problems, is to get in some run cycles for the smoke monsters chasing the little dudes. Additionally I have to render out all of the smoke. You can see on the shot of the close up of the hero opening the box that the smoke doesn't match up to the geometry. I suspect it is a difference in the way that cameras are handled between Maya and Houdini. Some of the middle shots won't make too much sense the way they are now. I know. I wanted to get the Maya renders out as soon as I could so that I could see them in motion and see what I need to fix.
The only nagging worry I have is that I still have not found a way to comp the shadow monsters coming out of the columns. Chris pointed me to "Deep Camera Maps" in Houdini but it took over an hour to render one frame... and there isn't much support on the topic in the Houdini community. I haven't had much time to devote to it but obviously I'll get to it in the coming week.
YouTube Link to a larger version of the above.
Sunday, November 14, 2010
Updated Previs
I updated the previs with rendered shots that I animated this weekend. Watching it right now I realized that I left out a shot of the previs. There is a reaction shot after the shadow monsters emerge from their smoke columns. Also I haven't updated the camera on the opening shot or the shadow monster crowd reveal, the one non rendered one after the columns hit. I am working on that shot now.
The second shot is probably too long. I showed it to some people and there seemed to be some agreement, and I agree, that I didn't really need that last shot. I could have the "No Fishing" sign reveal on the shot preceding it but facing the camera and towards the water.
If you have any crits I'd be more than happy to hear them. I'll be AMDO over the course of next week. I'm trying to have all the major animation done before Thanksgiving. Hopefully giving me two weeks for rendering and comp.
Monday, November 8, 2010
Camera Update and Timing
I went back into a shot that I will be animating this coming week. In order to get all of the smoke effects rolling I need to animate all of the shadow monsters. I want to get all of my camera work nailed down as soon as possible, especially for the effects shots so I went back into the full reveal of the shadow monsters and updated the camera move and timed it out better than what was in the older previs.
This is the overhead shot that immediately follows the above shot. This will be where a Massive sim comes in. I wanted to time this out so I get get some obj sequences into massive to do the "panic" sim.
This puts me at two primary Massive shots. The first is the opening shot of the town where they will be walking around and idling. The second is the above shot. There may be other opportunities for more, for example the moving shot of the columns coming down, they'd be running away. Shots like that secondary though because there would only be one or two of the Massive agents in view of the camera.
Old Previs
Sunday, November 7, 2010
Smoke Column Viewport Render
A viewport render from my smoke sim. The shot opens with Fisher opening up the box (he hasn't been animated yet) and the smoke columns shoot out and land. The Shadow monsters haven't been simmed out for this shot yet and they won't be visible until the smoke hits the ground.
Massive is going fairly well. I am pretty comfortable with my opening town sim when the townspeople are just milling about. Other than the one agent that decided to stop, turn directly towards the camera, and wave for about 30 seconds, the agents behave as expected. The "panic" mode part of the sim isn't perfect yet. They tend to ignore the painted boundaries and run right into the water or through buildings.
URL for the video if it doesn't work: http://www.youtube.com/watch?v=5MRqjYoY3SY
Subscribe to:
Posts (Atom)