

Thursday, February 7, 2013
Scanner
I bought a large format scanner. This is a dream come true. I will scan EVERYTHING. THE WORLD.

Sunday, February 3, 2013
How to Make a 3D Wiggle Gif
I had a request for an explanation on how I made this 3d gif:

Its pretty easy to do a simple gif similar to the one above. I used Photoshop but really all you need is something that can combine images into gifs.
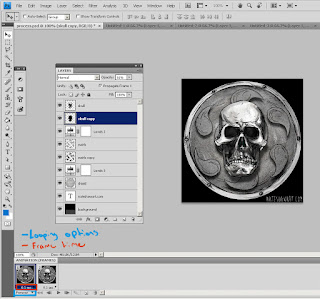
Step 1 Create Your Layers
The basic idea is that you are animating layers in Photoshop to create the illusion of depth by simulating what each eye might see in stereovision. The layers should represent things that are in front and behind other things in space. In my example I had 3 layers, the skull is in the foreground, the swirls are in the mid ground, and the circle is in the background. I drew these 3 images on separate pieces of paper, photographed them, and then erased everything around them in Photoshop so that each image had transparency around it.


Step 2 Combine Your Layers
Copy each of the images into one Photoshop doc, ordering them on different layers. The top layer should be what is closest and the next layer should be what is directly behind that and so on.

Step 3 Make Shadows
Duplicate each layer except the bottom one, use the contrast tool to make it black, blur it by about 3 pixels or whatever is appropriate to your image and then adjust the opacity to get a look you like. These shadow layers should be grouped with the layer that they are being cast on and they should always be sitting on top of a lower layer. No floating shadows! After this is done I like to group my layers for animation.
Right click on the layer and choose "Duplicate Layer..."

"Image->Adjustments->Brightness/Contrast"

"Filter->Blur->Gaussian Blur..."


Step 4 Animate It!
Turn on the animation timeline. Go to "Window->Animate", this will open up the animation timeline. The little thumbnail of your artwork represents one frame in your animation. The rate at which your animation will play is under that thumbnail and how your animation loops can be changed by the drop down below that. Now that your layers all are set up, duplicate the first frame. I like to keep the first frame clean of any changes, Photoshop's animation functionality isn't the most refined and you can quickly confuse yourself. Since this animation is really simulating the view from a pair of eyes, you only need two frames that swap off, looping forever.
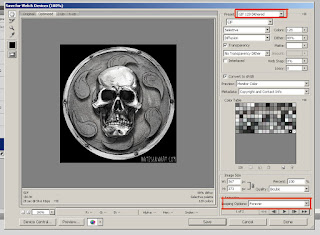
In the second frame, move the top layer to the right 1 pixel and the bottom layer left 1 pixel, keeping the middle layer in the same spot. This could be different for your individual image and the look you are going for but its a good place to start. Now make sure that the time is set to 0.1 sec, and it is looping forever. You can test your gif out by hitting the play button. If it looks good go to File>Save for Web and devices, set it the preset to "GIF 128 Dithered" and double check your animation settings in the bottom right of the popup.
This should give you a simple wiggle gif. The nature of this technique gives you a very "card-y" 3d gif. If something was truly in stereo, each eye would see something a little different, more of one side of the skull for example. That is a bit more tricky and would require careful drawing of two images for one object, renders from a 3d application, or photos taken from two cameras or a stereo camera. If anyone has questions or comments I'd be happy to answer anything in the comments. Thanks!
Its pretty easy to do a simple gif similar to the one above. I used Photoshop but really all you need is something that can combine images into gifs.
Step 1 Create Your Layers
The basic idea is that you are animating layers in Photoshop to create the illusion of depth by simulating what each eye might see in stereovision. The layers should represent things that are in front and behind other things in space. In my example I had 3 layers, the skull is in the foreground, the swirls are in the mid ground, and the circle is in the background. I drew these 3 images on separate pieces of paper, photographed them, and then erased everything around them in Photoshop so that each image had transparency around it.

Step 2 Combine Your Layers
Copy each of the images into one Photoshop doc, ordering them on different layers. The top layer should be what is closest and the next layer should be what is directly behind that and so on.

Step 3 Make Shadows
Duplicate each layer except the bottom one, use the contrast tool to make it black, blur it by about 3 pixels or whatever is appropriate to your image and then adjust the opacity to get a look you like. These shadow layers should be grouped with the layer that they are being cast on and they should always be sitting on top of a lower layer. No floating shadows! After this is done I like to group my layers for animation.
Right click on the layer and choose "Duplicate Layer..."

"Image->Adjustments->Brightness/Contrast"

"Filter->Blur->Gaussian Blur..."


Step 4 Animate It!
Turn on the animation timeline. Go to "Window->Animate", this will open up the animation timeline. The little thumbnail of your artwork represents one frame in your animation. The rate at which your animation will play is under that thumbnail and how your animation loops can be changed by the drop down below that. Now that your layers all are set up, duplicate the first frame. I like to keep the first frame clean of any changes, Photoshop's animation functionality isn't the most refined and you can quickly confuse yourself. Since this animation is really simulating the view from a pair of eyes, you only need two frames that swap off, looping forever.

In the second frame, move the top layer to the right 1 pixel and the bottom layer left 1 pixel, keeping the middle layer in the same spot. This could be different for your individual image and the look you are going for but its a good place to start. Now make sure that the time is set to 0.1 sec, and it is looping forever. You can test your gif out by hitting the play button. If it looks good go to File>Save for Web and devices, set it the preset to "GIF 128 Dithered" and double check your animation settings in the bottom right of the popup.

This should give you a simple wiggle gif. The nature of this technique gives you a very "card-y" 3d gif. If something was truly in stereo, each eye would see something a little different, more of one side of the skull for example. That is a bit more tricky and would require careful drawing of two images for one object, renders from a 3d application, or photos taken from two cameras or a stereo camera. If anyone has questions or comments I'd be happy to answer anything in the comments. Thanks!
Monday, December 24, 2012

Baldur's Gate Comic
The Baldur's Gate series of computer RPGs are my favorite games. With the recent release of the Extended Edition of the first game, I have had it on my mind. I doubt I will get a chance to play the Extended Edition any time soon, but the idea that its there is almost enough for me. In honor of the game, it came out 14 years ago, I am making a short comic based on part of the story. It will only be a couple of pages long but I am super excited to work on it. So excited that I made a 3D gif for it!
Wednesday, December 19, 2012
The Wall
This is a drawing of Parker Dam I started at Joshua Tree NP. At the time we visited, the dam wasn't holding any water back. Instead it just felt like a remnant of some ruined building.
I didn't get very far in the drawing but kept drawing over it in my spare time for the last couple of months; waiting for renders, sitting on a bus, on lunch breaks, etc. I ended up changing the scale quite a bit and adding in details that were never there. I like drawing because it allows me to go places that don't exist.

I didn't get very far in the drawing but kept drawing over it in my spare time for the last couple of months; waiting for renders, sitting on a bus, on lunch breaks, etc. I ended up changing the scale quite a bit and adding in details that were never there. I like drawing because it allows me to go places that don't exist.

Monday, December 17, 2012
Figure Drawing and new materials


For the past year I have been going to figure drawing and basically drawing the same thing, over and over. Since I ride my bike everywhere I am limited by what I can carry in my bag. That was the excuse I always gave myself as to why I never changed up my media. However, the other day I was looking through some of my old art supplies and found an ink pen. The kind you dip into ink to load it up. Its probably a holdover from my very brief stint with calligraphy (almost 10 years ago). Its awesome! I love the variation of the line weight, something I usually don't get with pen.

Thursday, December 6, 2012
Mr Mouse & 24 comics day

Whoa! How did I miss posting about 24 hour comics day? Its already December!
Every year on a in October, comic writers, artists, and enthusiasts around the world gather together in some way (comic shops, libraries, the internet) and make a 24 page comic book in 24 hours. This day is called 24 Hour Comics Day. This year Melissa and I went to a local comic shop, The Comic Bug in Manhattan Beach, CA, that hosted an event for 24hcd. Comic Bug was awesome, they supplied food, drinks, tables, and supplies if you needed them. Beginning at noon on Saturday, I ended up finishing my comic at about 7 am Sunday morning. The next weekend I added an inkwash and cleaned it up a bit. You can read it on my website here.
Subscribe to:
Posts (Atom)